반응형
액션바 탭바 프레그먼트
#개념

#화면

#설정
왼족 네비게이션 바에서 values-> style.xml 들어가서 parent 부분을 NoActionBar로 해준다.
<style name="AppTheme" parent="Theme.AppCompat.Light.NoActionBar">
외부라이브러리 추가
file->project structure -> app -> dependenc.. -> + 클릭 -> 라이브러리 디펜텐시스 com.android.support.design 클릭-> ok
build gradle 적용(맨밑에)
compile 'com.android.support:design:25.+'#메인 엑티비티 레이아웃
1 2 3 4 5 6 7 8 9 10 11 12 13 14 15 16 17 18 19 20 21 22 23 24 25 26 27 28 29 30 31 32 33 34 35 36 37 38 39 40 41 42 43 44 45 46 47 48 49 50 51 52 53 54 55 56 57 58 | <?xml version="1.0" encoding="utf-8"?> <RelativeLayout xmlns:android="http://schemas.android.com/apk/res/android" android:layout_width="match_parent" android:layout_height="match_parent" xmlns:app="http://schemas.android.com/apk/res-auto"> //전체 레이아웃 잡아줌 <android.support.design.widget.CoordinatorLayout android:layout_width="match_parent" android:layout_height="match_parent"> //액션바 레이아웃 <android.support.design.widget.AppBarLayout android:layout_width="match_parent" android:layout_height="wrap_content" android:theme="@style/ThemeOverlay.AppCompat.Dark.ActionBar"> //툴바정의 <android.support.v7.widget.Toolbar android:layout_width="match_parent" android:layout_height="wrap_content" android:background="@color/colorPrimaryDark" android:elevation="1dp" android:id="@+id/toolbar"> </android.support.v7.widget.Toolbar> //탭레이아웃(탭버튼을 담는다.) <android.support.design.widget.TabLayout android:id="@+id/tabs" android:layout_width="match_parent" android:layout_height="wrap_content" android:elevation="1dp" android:background="@android:color/background_light" app:tabMode="fixed" app:tabGravity="fill" app:tabTextColor="@color/colorPrimary" app:tabSelectedTextColor="@color/colorAccent"> </android.support.design.widget.TabLayout> </android.support.design.widget.AppBarLayout> //프레그먼트 넣을 곳 <FrameLayout android:id="@+id/container" android:layout_width="match_parent" android:layout_height="match_parent" app:layout_behavior="@string/appbar_scrolling_view_behavior"> </FrameLayout> </android.support.design.widget.CoordinatorLayout> </RelativeLayout> | cs |
#프레그먼트 1,2,3 레이아웃
1 2 3 4 5 6 7 8 9 10 11 12 13 14 | <?xml version="1.0" encoding="utf-8"?> <LinearLayout xmlns:android="http://schemas.android.com/apk/res/android" android:orientation="vertical" android:layout_width="match_parent" android:layout_height="match_parent"> <TextView android:layout_width="match_parent" android:layout_height="match_parent" android:text="fragment1" android:textSize="40dp" android:background="@android:color/holo_purple" /> </LinearLayout> | cs |
#메인 엑티비티.java
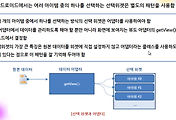
1 2 3 4 5 6 7 8 9 10 11 12 13 14 15 16 17 18 19 20 21 22 23 24 25 26 27 28 29 30 31 32 33 34 35 36 37 38 39 40 41 42 43 44 45 46 47 48 49 50 51 52 53 54 55 56 57 58 59 60 61 62 63 64 65 66 67 68 69 70 71 72 73 74 75 76 77 78 79 80 81 82 83 84 85 86 87 88 89 | package me.happygate.myactionbar; import android.support.design.widget.TabLayout; import android.support.v4.app.Fragment; import android.support.v7.app.AppCompatActivity; import android.os.Bundle; import android.support.v7.widget.Toolbar; public class MainActivity extends AppCompatActivity { Fragment1 fragment1; Fragment2 fragment2; Fragment3 fragment3; @Override protected void onCreate(Bundle savedInstanceState) { super.onCreate(savedInstanceState); setContentView(R.layout.activity_main); //1툴바 설정 Toolbar toolbar=(Toolbar)findViewById(R.id.toolbar); setSupportActionBar(toolbar); //2xml 프래그먼트를 보여주기 fragment1=new Fragment1(); fragment2=new Fragment2(); fragment3=new Fragment3(); //프레그먼트를 메니져로 보여줌 getSupportFragmentManager().beginTransaction().add(R.id.container,fragment1).commit(); //3탭기능 구성 TabLayout tabs=(TabLayout)findViewById(R.id.tabs); tabs.addTab(tabs.newTab().setText("친구")); tabs.addTab(tabs.newTab().setText("일대일채팅")); tabs.addTab(tabs.newTab().setText("기타")); //탭버튼을 클릭했을 때 프레그먼트 동작 tabs.setOnTabSelectedListener(new TabLayout.OnTabSelectedListener() { @Override public void onTabSelected(TabLayout.Tab tab) { //선택된 탭 번호 반환 int position =tab.getPosition(); Fragment selected = null; if(position == 0 ){ selected = fragment1; }else if(position == 1 ){ selected =fragment2; }else if(position == 2 ){ selected =fragment3; } //선택된 프레그먼트로 바꿔줌 getSupportFragmentManager().beginTransaction().replace(R.id.container, selected).commit(); } @Override public void onTabUnselected(TabLayout.Tab tab) { } @Override public void onTabReselected(TabLayout.Tab tab) { } }); } } | cs |
#프레그먼트1,2,3 .java
1 2 3 4 5 6 7 8 9 10 11 12 13 14 15 16 17 18 19 20 21 22 23 | package me.happygate.myactionbar; import android.os.Bundle; import android.support.annotation.Nullable; import android.support.v4.app.Fragment; import android.view.LayoutInflater; import android.view.View; import android.view.ViewGroup; public class Fragment1 extends Fragment { @Nullable @Override public View onCreateView(LayoutInflater inflater, @Nullable ViewGroup container, @Nullable Bundle savedInstanceState) { // xml 로 만들어준 프레그먼트를 자바 단에서 만들어줌 ViewGroup rootGroup =(ViewGroup)inflater.inflate(R.layout.fragment1,container,false); return rootGroup; } } | cs |

반응형
'매일코딩 > 안드로이드' 카테고리의 다른 글
| [안드로이드 기초] 리스트뷰 어뎁터로 데이터 보여주기 (0) | 2017.08.25 |
|---|---|
| [안드로이드 기초] 버튼을 비트맵 이미지로 바꾸기 (0) | 2017.08.25 |
| [안드로이드 기초] 상대 레이아웃 (0) | 2017.08.24 |
| [안드로이드 기초]리니어 레이아웃 연습 (0) | 2017.08.24 |
| [안드로이드 기초] 프레그먼트로 이미지뷰 띄우기 (0) | 2017.08.23 |


댓글