반응형
프레그먼트
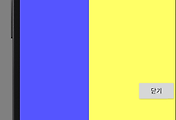
#결과화면
main버튼과 menu버튼을 누르면 밑에 fragment 화면이 바뀐다.

#mainActivity.xml

1 2 3 4 5 6 7 8 9 10 11 12 13 14 15 16 17 18 19 20 21 22 23 24 25 26 27 28 29 30 31 32 33 34 35 36 37 38 39 40 41 42 | <?xml version="1.0" encoding="utf-8"?> <RelativeLayout xmlns:android="http://schemas.android.com/apk/res/android" android:layout_width="match_parent" android:layout_height="match_parent"> <Button android:id="@+id/button" android:layout_width="wrap_content" android:layout_height="wrap_content" android:layout_alignParentLeft="true" android:layout_alignParentStart="true" android:layout_alignParentTop="true" android:text="main" /> <FrameLayout android:id="@+id/container" android:layout_width="match_parent" android:layout_height="match_parent" android:layout_below="@+id/button"> <!-- xml로 프래그먼트 만들기 <fragment android:id="@+id/mainFragment" android:layout_width="match_parent" android:layout_height="match_parent" android:name="me.happygate.myfragment.MainFragment"></fragment>--> </FrameLayout> <Button android:id="@+id/button2" android:layout_width="wrap_content" android:layout_height="wrap_content" android:layout_alignParentTop="true" android:layout_marginLeft="21dp" android:layout_marginStart="21dp" android:layout_toEndOf="@+id/button" android:layout_toRightOf="@+id/button" android:text="menu" /> </RelativeLayout> | cs |
#mainActivity.java
1 2 3 4 5 6 7 8 9 10 11 12 13 14 15 16 17 18 19 20 21 22 23 24 25 26 27 28 29 30 31 32 33 34 35 36 37 38 39 40 41 42 43 44 45 46 47 48 49 50 51 52 53 54 55 56 57 58 59 60 61 62 63 64 65 66 67 68 | package me.happygate.myfragment; import android.os.Bundle; import android.support.v7.app.AppCompatActivity; import android.util.Log; import android.view.View; import android.widget.Button; public class MainActivity extends AppCompatActivity { MainFragment fragment1; MenuFragment fragment2; @Override protected void onCreate(Bundle savedInstanceState) { super.onCreate(savedInstanceState); setContentView(R.layout.activity_main); //프래그먼트 객체 만들기 //프레그먼트 안에 들어가는 최상위 레이아웃 리턴 rootView fragment1 = new MainFragment(); //프레그먼트 안에 들어가는 최상위 레이아웃 리턴 rootView fragment2 = new MenuFragment(); //자바 소스로 프래그먼트 불러오기 Button button =(Button)findViewById(R.id.button); button.setOnClickListener(new View.OnClickListener() { @Override public void onClick(View v) { getSupportFragmentManager().beginTransaction().replace(R.id.container, fragment1).commit(); } }); Button button2 =(Button)findViewById(R.id.button2); button2.setOnClickListener(new View.OnClickListener() { @Override public void onClick(View v) { // getSupportFragmentManager().beginTransaction().replace(R.id.container, fragment2).commit(); } }); } //프래그먼트 안의 버튼을 클릭했을 때 작동하는 함수 public void onFragmentChange(int index){ if(index == 0 ){ getSupportFragmentManager().beginTransaction().replace(R.id.container, fragment1).commit(); }else if(index == 1){ getSupportFragmentManager().beginTransaction().replace(R.id.container, fragment2).commit(); } } } | cs |
#mainFragment.java
1 2 3 4 5 6 7 8 9 10 11 12 13 14 15 16 17 18 19 20 21 22 23 24 25 26 27 28 29 30 31 32 33 34 35 36 37 38 39 40 41 42 43 44 45 46 47 48 49 50 51 52 53 54 55 56 57 58 59 60 61 62 63 64 65 66 67 68 69 | package me.happygate.myfragment; import android.content.Context; import android.os.Bundle; import android.support.annotation.Nullable; import android.support.v4.app.Fragment; import android.util.Log; import android.view.LayoutInflater; import android.view.View; import android.view.ViewGroup; import android.widget.Button; /** * Created by kang on 2017-08-17. */ //인플레이터를 통해서 프래그먼트xml과 연결시켜 준다. //프레그먼트는 실제 화면은 아니다. 화면을 담기위한 틀이다. public class MainFragment extends Fragment { MainActivity activity; //프래그먼트가 엑티비티위에 올라갈때 호출되는 함수 @Override public void onAttach(Context context) { super.onAttach(context); //참고:엑티비티 위에 프래그먼트가 올라가서 동작한다. //이 프레그먼트가 동작하는 엑티비티를 참조할 수 있다. //mainactivity를 참조한다. //getActivity(); activity = (MainActivity) getActivity(); } @Override public void onDetach() { super.onDetach(); activity = null; } @Nullable @Override public View onCreateView(LayoutInflater inflater, @Nullable ViewGroup container, @Nullable Bundle savedInstanceState) { //(프레그먼트를 , 여기에 붙여달라.) ViewGroup rootView=(ViewGroup)inflater.inflate(R.layout.fragment_main,container,false); //인플레이션 후 메모리에 올라간다. id로 찾을 수 있다. //프레그먼트 안에 들어가있는 버튼 Button button = (Button)rootView.findViewById(R.id.button); button.setOnClickListener(new View.OnClickListener() { @Override public void onClick(View v) { //프래그먼트 안에서 버튼으로 메뉴화면 호출 Log.d("main fragment", "onFragmentChange"); activity.onFragmentChange(1); } }); //프레그먼트 안에 들어가는 최상위 레이아웃 리턴 return rootView; } } | cs |
#mainFragment.xml

1 2 3 4 5 6 7 8 9 10 11 12 13 14 15 16 17 18 19 20 | <?xml version="1.0" encoding="utf-8"?> <LinearLayout xmlns:android="http://schemas.android.com/apk/res/android" android:layout_width="match_parent" android:layout_height="match_parent" android:background="@android:color/holo_orange_dark" android:orientation="vertical"> <TextView android:id="@+id/textView" android:layout_width="match_parent" android:layout_height="wrap_content" android:text="fragment1" android:textSize="40dp" /> <Button android:id="@+id/button" android:layout_width="wrap_content" android:layout_height="wrap_content" android:text="to Menu Page" /> </LinearLayout> | cs |
#MenuFragment.java
1 2 3 4 5 6 7 8 9 10 11 12 13 14 15 16 17 18 19 20 21 22 23 24 25 26 27 28 29 30 31 | package me.happygate.myfragment; import android.os.Bundle; import android.support.annotation.Nullable; import android.support.v4.app.Fragment; import android.view.LayoutInflater; import android.view.View; import android.view.ViewGroup; /** * Created by kang on 2017-08-17. */ //인플레이터를 통해서 프래그먼트xml과 연결시켜 준다. //프레그먼트는 실제 화면은 아니다. 화면을 담기위한 틀이다. public class MenuFragment extends Fragment { @Nullable @Override public View onCreateView(LayoutInflater inflater, @Nullable ViewGroup container, @Nullable Bundle savedInstanceState) { ViewGroup rootView=(ViewGroup)inflater.inflate(R.layout.fragment_menu,container,false); //(프레그먼트를 , 여기에 붙여달라.) //프레그먼트 안에 들어가는 최상위 레이아웃 리턴 return rootView; } } | cs |
#MenuFragment.xml

1 2 3 4 5 6 7 8 9 10 11 12 13 14 15 16 17 18 19 20 | <?xml version="1.0" encoding="utf-8"?> <LinearLayout xmlns:android="http://schemas.android.com/apk/res/android" android:layout_width="match_parent" android:layout_height="match_parent" android:background="@android:color/holo_blue_bright" android:orientation="vertical"> <TextView android:id="@+id/textView" android:layout_width="match_parent" android:layout_height="wrap_content" android:text="fragment2" android:textSize="40dp" /> <Button android:id="@+id/button2" android:layout_width="wrap_content" android:layout_height="wrap_content" android:text="to main Page" /> </LinearLayout> | cs |
#프래그먼트 개념


반응형
'매일코딩 > 안드로이드' 카테고리의 다른 글
| [안드로이드 기초]리니어 레이아웃 연습 (0) | 2017.08.24 |
|---|---|
| [안드로이드 기초] 프레그먼트로 이미지뷰 띄우기 (0) | 2017.08.23 |
| [안드로이드 기초] 화면에 애니메이션 효과 적용하기 (0) | 2017.08.22 |
| [안드로이드 기초] 안드로이드 애니메이션 (0) | 2017.08.21 |
| [안드로이드 기초] 프로그레스바 시크바 (0) | 2017.08.18 |


댓글